Yes, drainage holes are required for planter box survival. Without them, water pools around roots, suffocating them and triggering root rot, fungal growth, and bacterial disease. I’ve seen even hardy plants decline within weeks in waterlogged soil. Whether you’re gardening outdoors facing rain and freeze-thaw cycles or keeping plants indoors, proper drainage—typically 5/8″ holes near the bottom—prevents these problems. A gravel base layer amplifies this protection. Skip drainage, and you’re setting up plant failure. There’s more to discover about sizing holes correctly and designing boxes that work well.
Do Planter Boxes Actually Need Drainage Holes?

Why do so many gardeners insist on drainage holes? I’ve found that drainage holes are essential for plant health. They’re your first defense against root rot by letting excess water escape and preventing waterlogged soil. When you’re watering your planters, moisture control becomes critical—standing water suffocates roots and invites disease.
Here’s what I’ve learned: outdoor planters especially need drainage holes. They face rain, melted snow, and unpredictable weather that adds moisture constantly. Without proper drainage, your planters get heavy and risk structural damage.
Even indoor planters benefit from holes. Sure, you can use cache pots or saucers as alternatives, but I recommend drainage holes for long-term plant health. Your plants will perform better with this simple feature in place.
Why Poor Drainage Causes Root Rot in Planter Boxes

When water sits in your planter box instead of draining away, you’re creating the perfect conditions for root rot to take hold. Without proper drainage holes, moisture accumulates around your plant’s roots, suffocating them and blocking oxygen flow.
Here’s what happens: consistently damp soil fosters fungal growth and bacterial proliferation that compromise your plant’s health. Standing water at the bottom prevents roots from absorbing nutrients effectively, causing your plants to weaken and decline in vigor.
Root systems literally drown in waterlogged conditions, especially in containers lacking drainage holes or with clogged bottom screens. The solution is straightforward: adding drainage holes and a drainage layer maintains oxygen-rich soil. This simple step prevents moisture-related root damage and keeps your plants in good condition.
Outdoor Planters: Handling Rain and Freeze-Thaw Cycles

Outdoor planter boxes face challenges that indoor containers don’t—relentless rain and the expansion of freezing water can compromise both your plants and the box itself. You’ll want drainage holes positioned strategically to manage moisture effectively. Without them, water pools around roots and soil becomes waterlogged, especially during heavy rainfall.
Here’s where freeze-thaw cycles matter: water trapped in soil expands when it freezes, putting pressure on your box’s walls and damaging its structure. Drainage holes prevent this dangerous accumulation. I recommend adding a gravel layer beneath your soil to help water exit quickly. For larger outdoor planters, consider side drainage holes near the bottom for enhanced water movement.
Spring maintenance is important too—clear any obstructed drainage paths so your system works properly throughout the growing season.
Drainage Solutions for Indoor Planter Boxes

If you’re bringing planter boxes indoors, you’ll want to explore drainage layers and moisture management techniques that protect your floors while keeping your plants healthy. Understanding your options—from traditional drainage holes paired with saucers to self-watering systems and cache pots—helps you choose what works best for your space and plant needs. The key is preventing root rot indoors by balancing water retention with proper airflow, which you can achieve through several containment methods.
Indoor Drainage Layer Options
How do you keep water from pooling at the bottom of your indoor planter box? Creating a proper drainage layer is essential for indoor planters. You’ll want to place a non-decomposing material beneath your soil that lets water escape while preventing soil from compacting.
What works best:
- Gravel or pebbles create space for water movement
- Drainage mesh prevents soil from blocking water flow
- Non-decomposing materials maintain performance long-term
- A plastic liner separates soil from wood while allowing drainage
- Screening at drainage holes keeps soil contained
Combine these elements—use mesh topped with gravel for reliable results. This setup protects your indoor planters while keeping roots in good condition and preventing moisture damage to your furniture.
Managing Moisture For Houseplants
Within the context of indoor planter boxes, proper moisture management becomes your best defense against root rot, fungal issues, and water damage to floors and furniture. Monitoring moisture levels consistently keeps plants in good condition. You can use a moisture meter or simply stick your finger an inch into the soil—if it feels dry, water; if it’s wet, wait.
For planters without drainage holes, I rely on high-quality soil mixes designed for indoor plants. These drain better naturally, reducing waterlogging risks. When drainage is present, I’m careful not to overwater. You’ll develop a rhythm once you understand your home’s humidity and light conditions.
Preventing Root Rot Indoors
Now that you’ve got your moisture monitoring routine down, let’s address the root cause of most indoor plant failures: root rot.
When soil stays waterlogged, roots can’t breathe. They suffocate and decay, spreading disease throughout your plant. Here’s how we prevent this together:
- Install drainage holes—at least two per planter, proportional to size
- Use cache pots or saucers—they catch excess water without damaging floors
- Choose self-watering systems—perfect for non-draining setups with built-in reservoirs
- Drill strategically—use spur-point bits for plastic, spade bits for fiberglass
- Monitor water levels—empty saucers after 30 minutes to prevent reabsorption
These solutions work because they let oxygen reach roots while preventing pooling. You’re not just adding holes; you’re creating an environment where your plants can function properly. That’s the indoor gardening community we’re building.
Hole Sizes and Placement: Why 5/8″ Beats Guesswork

When you’re ready to drill drainage holes in your planter, use proven sizes rather than guessing. I recommend 5/8 inch or 3/4 inch holes—they’re large enough to let water escape quickly without clogging. You’ll place these drainage holes in the bottom of your planter, and you can add them to the sides too for better water movement.
The tool matters here. For plastic pots, grab a handheld drill with a regular twist bit. If you’re working with ceramic or terra cotta, switch to a masonry bit instead. Position your drainage holes carefully to avoid hitting any structural supports inside your planter. If water still pools after drilling, you can always add more holes later to improve drainage further.
Drilling Drainage Holes Into Existing Planters

If you’ve got a planter box without drainage, you can fix it yourself by drilling the right size holes in the right spots using the right technique. You’ll want to drill 5/8″ to 3/4″ holes in the bottom and add smaller 3/8″ side holes if needed, but the method changes depending on whether you’re working with ceramic, terra cotta, or plastic. Once you drill, test your drainage by watering and add more holes if water sits too long in the soil.
Hole Size And Placement
Hole Size And Placement
How many drainage holes does your planter actually need? The answer depends on your planter’s dimensions and material type.
What works best:
- Plastic planters: Start with ½-inch holes, then adjust to ¾-inch if you need more drainage
- Fiberglass planters: Use 1-inch or ½-inch spade bits for cleaner results
- Minimum requirement: Two holes for smaller containers
- Larger planters: 3–4 holes for 36-inch boxes; 4–6 holes for 46-inch boxes
- Placement strategy: Position holes away from supports to avoid interference
Drill slowly to prevent melting plastic or creating rough edges. Space your drainage holes evenly across the bottom so water exits uniformly. Even distribution prevents soggy spots and keeps your plants in good condition. Vacuum fiberglass dust afterward for a clean finish.
Drilling Different Planter Materials
Drilling Different Planter Materials
You’ve got plenty of options for drilling drainage holes into existing planters, and the process differs slightly depending on what material you’re working with.
Plastic Planters
I start with a 1/2-inch twist bit and drill slowly to prevent melting the material. Securing the planter upright on a flat surface keeps everything stable during drilling.
Fiberglass Planters
These are tougher, so I use a 1-inch or 1/2-inch spade drill bit instead. Fiberglass dust is messy, so I vacuum immediately afterward to keep my workspace clean.
General Setup
For both materials, I work at slow speeds and keep the planter steady. This approach prevents damage and ensures clean drainage holes that will function properly for years.
Testing And Adjusting Drainage
Once you’ve drilled those drainage holes, the real work begins—testing whether your drainage setup actually performs as intended.
I recommend you follow this straightforward approach:
- Water your planter thoroughly and observe how quickly water exits the drainage holes
- Use a soil moisture meter to check moisture levels at different depths
- Take multiple measurements throughout the day to track changes
- Monitor for standing water that pools on the soil surface
- Adjust hole placement if you notice uneven drainage across the bottom
If water drains too slowly or pools remain after 30 minutes, don’t hesitate to drill additional 5/8″ to 3/4″ holes. I’ve found that strategic placement avoiding support areas ensures even water distribution. Testing your drainage holes regularly helps you catch problems early and keeps your plants healthy.
Soil and Rock Layers: The Planter Box Drainage Base

What’s sitting beneath your soil matters just as much as what’s growing in it. I recommend adding a 1–2 inch gravel layer at your planter’s bottom to create an effective drainage base. This rock foundation works as a moisture buffer, allowing water to escape through gaps while preventing soil from becoming waterlogged.
A 1–2 inch gravel layer beneath your soil creates an effective drainage base, allowing water to escape while preventing waterlogging.
Here’s why this matters: the gravel layer stops soil particles from clogging drainage holes, which keeps your plants healthy. You’re creating a pathway for excess water to exit quickly.
However, if you’re using a reservoir design with an impermeable liner, skip mixing gravel directly into soil—this prevents blockage and algae growth. Instead, keep them separate. Whether you choose traditional gravel or a modern reservoir system, you’re investing in your plants’ long-term success.
How to Tell If Your Drainage Is Actually Working

You can verify your drainage is working by checking your soil moisture levels throughout the day—if the soil stays consistently wet rather than drying out, you’ve got a problem. Observe your planter’s drainage performance after watering by watching for water that exits quickly through the bottom holes and checking that no wet spots remain in the soil. If water pools around the roots or the soil remains soggy after a few hours, your drainage needs adjustment through better holes, improved soil layers, or reconsidering your liner setup.
Testing Soil Moisture Levels
How can you know if your drainage system’s actually doing its job? I grab my moisture meter and start testing!
Here’s what I look for:
- Dry soil = under-watering or drainage holes working too hard
- Moist soil = the ideal condition where roots function properly
- Wet soil = drainage problems or water-retentive soil issues
- Morning measurements = reveal overnight moisture retention
- Afternoon readings = show how quickly soil dries
I take multiple measurements throughout the day to catch fluctuations. This tells me if my drainage holes, soil layers, and amendments are actually working together. When I consistently find moist (not soggy) soil, I know my planter’s drainage design is performing at the expected level. Regular testing confirms my setup matches what my specific plants need!
Observing Drainage Performance
Once you’ve set up your planter box with drainage holes and soil amendments, the real test begins—actually watching whether water moves through your system the way it should. I’d recommend grabbing a moisture meter to track what’s really happening in your soil. Take readings at different times throughout the day to spot fluctuations that reveal your drainage’s true performance.
If you’re consistently seeing wet soil, that signals drainage trouble needing immediate attention. Moist soil hits that sweet spot—your plants will flourish! Dry soil suggests you’re either underwatering or need better water-retaining amendments.
Pay close attention to how quickly water exits after watering. Check your planter’s design too—whether it’s bottom holes, side holes, or a reservoir system. This ongoing monitoring confirms your drainage stays effective long-term, especially after modifications.
Removable Bottoms: Easy Maintenance

What if the weakest part of your planter box didn’t have to spell the end of the whole structure?
I’ve found that removable bottom boards transform how we maintain planters long-term. Here’s why this design matters:
- Bottom boards absorb the most moisture damage over time
- A loose-fit design with a 1/2 inch lip makes removal simple
- You can replace just the damaged section instead of rebuilding everything
- Drainage holes work better when you can access and maintain the base
- This strategy extends your planter’s lifespan substantially
Rather than watching your entire investment deteriorate, you’re addressing moisture exposure exactly where it happens—at the base. When bottoms eventually wear out, you simply slide out the old boards and install new ones. It’s honest maintenance that keeps your planter functional without unnecessary replacement costs.
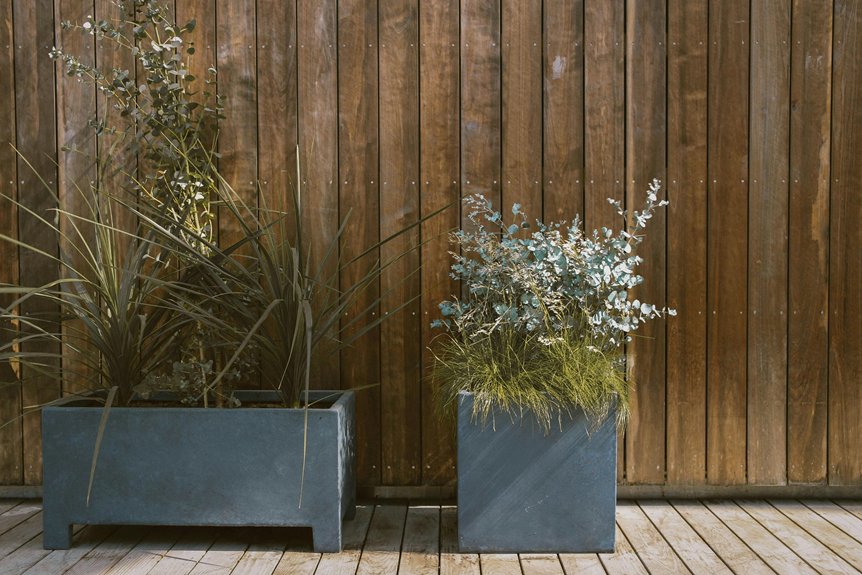
Planter Box Slat Spacing for Built-In Drainage

You’ve probably noticed that even the best drainage holes won’t solve everything—the space between your planter’s side slats matters just as much. Deliberate gaps between slats work alongside your drainage system to create the airflow plants need.
| Slat Spacing | Benefit | Best For |
|---|---|---|
| ¼ inch | Maximum airflow | Wet climates |
| ½ inch | Balanced moisture | Most gardens |
| ¾ inch | Soil visibility | Decorative boxes |
| 1 inch | Heavy drainage | Tropical plants |
| No gaps | Moisture retention | Arid regions |
These gaps let water escape and air circulate around soil, preventing waterlogging. When you pair proper slat spacing with bottom drainage holes, you’re creating a complete system that keeps roots healthy. Treat slat gaps as essential design features, not afterthoughts. Proper spacing makes a real difference in plant performance.
Skip Holes: Try Self-Watering Systems or Cache Pots

While slat spacing creates excellent airflow for traditional planters, there’s another path entirely: you can skip drainage holes altogether by using systems designed to manage water internally.
Skip drainage holes entirely by designing internal water management systems tailored to your plants’ specific needs.
These approaches work for plant owners:
- Self-watering systems use internal reservoirs that supply moisture as your plants need it
- Cache potting places a smaller permeable pot inside a larger outer planter, containing drainage
- Capillary wicks draw water upward through soil using simple physics
- Planter saucers catch excess water externally, keeping your planter dry
- DIY cross risers create air pockets that regulate moisture naturally
The key? You’ll need to monitor watering carefully and select plants that tolerate consistent moisture. These self-watering systems eliminate traditional drainage holes while protecting your plant’s roots from waterlogging. You’re creating your own moisture-control system tailored to your specific needs.
DIY Planter Boxes With Built-In Drainage

How can you build a planter that keeps roots healthy instead of drowning them? Here’s a straightforward approach.
Start by drilling drainage holes (5/8″ to 3/4″ diameter) near the bottom of your box—these are necessary for water escape. Add a gravel or rock layer underneath to prevent soil from clogging those holes. Space your bottom slats with gaps between them, allowing water and air to reach roots freely.
I recommend using a removable bottom board so you can easily replace it if moisture damage occurs. This design choice extends your planter’s lifespan considerably.
Fill your box with well-draining soil mixed with perlite or sand. Elevate the entire planter on risers to improve drainage. Monitor soil moisture regularly using a meter, adjusting your watering schedule based on actual conditions. This keeps your drainage system working effectively long-term.
Why Drainage Secures Long-Term Planter Life

Now that you’ve built a planter with proper drainage holes and layers, let’s talk about why this setup matters for keeping your plants healthy. You’re investing in your garden’s future when you prioritize moisture management and effective drainage holes.
Here’s what you’re protecting:
- Root health – Oxygen reaches roots when water drains properly
- Fungal prevention – Waterlogging creates conditions where fungi and bacteria develop
- Planter longevity – Wet soil breaks down wood and corrodes materials faster
- Plant vigor – Healthy drainage means stronger, more productive plants
- Consistent results – You’ll develop confidence in your watering routine
When water escapes freely through those drainage holes and your soil layers work together, you’re preventing the silent killers: root rot and fungal growth. Your planter becomes a reliable home where plants perform well season after season.